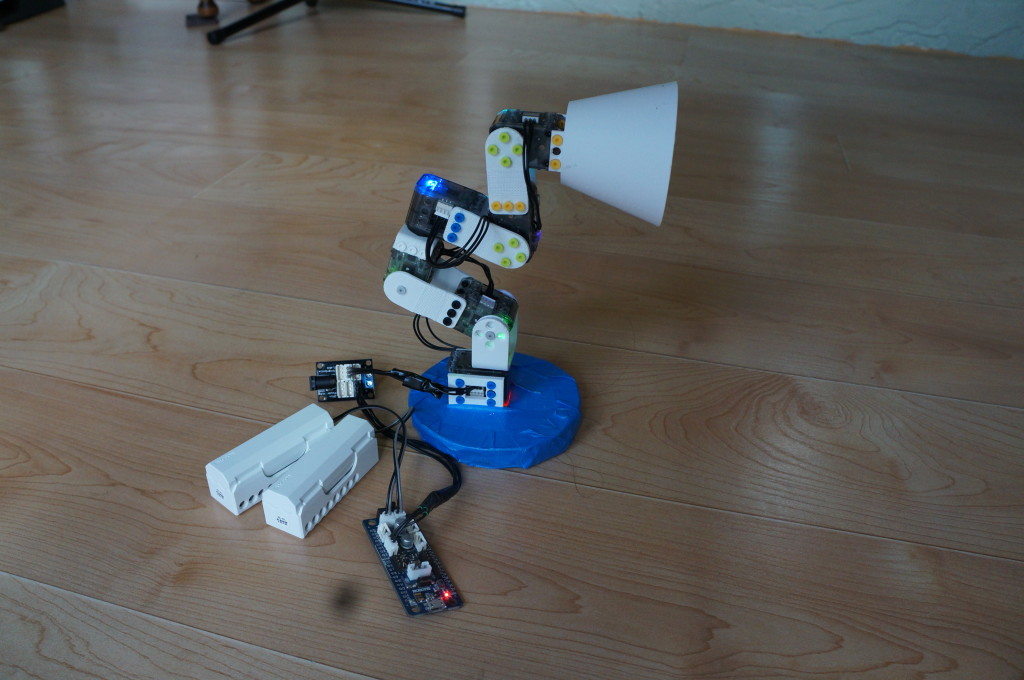
Created a simplified version of the OpenCM program to run a Poppy Ergo Jr -based robotic arm. This is being used by our 1st grade daughter and friend at the school STEM expo. There is just three lines of code they need to change to create new robotics poses. It’s a great educational tool to have them see code and provides opportunities to teach concepts like: angles, servos, RGB and binary. Or just have fun making a colorful robotic arm strike a pose.

Here is the main program and include file used for the project. We also used another program, not shown, that let us move the arm to a pose and then print out the servo values. This allowed a simple cut and paste for new pose creation.
FILE #1 of 2: PoppyEgoJr.ino
/* ********************** PoppyErgoJr Project ***********************************
Description: Cycle a robotic arm through a number of poses.
Created: Feb 2016
by PrimoRobots
Based on Poppy Ergo Jr https://www.poppy-project.org/creatures/poppy-ergo-junior/
This uses the OpenCM controller development environment. The software is available here:
http://support.robotis.com/en/techsupport_eng.htm#software/robotis_opencm.htm
HOW TO CHANGE THE CODE TO ADD NEW POSES
STEP 1
First define a new pose by changing the numbers in the brackets
Be sure to give the pose a name different from your other poses
The first 6 numbers are the position of the motors; use numbers 0 to 1023
The next 6 numbers are the LED colors of each motor; use numbers 0 to 7
The last 6 numbers are the speed the motors move; use numbers 1 to 1023
NAME POSITION OF MOTOR MOTOR COLORS MOTOR SPEEDS
int Awake[3][6] = {{512, 731, 263, 512, 119, 839},{1,2,3,4,5,6},{70,70,70,70,70,70}};
STEP 2
In the loop section add a description to print out and make the robot strite the pose you created
Code example explained
SerialUSB.println(“Awake”); // your pose name, words between quotes “” prints out
Strike_A_Pose(Awake); // this makes the robot move to the pose between ()
delay(12000); // delay is a wait to let the robot move and pose
Cost and Parts
Approximate cost not counting 3D printing costs is $183.50 to $220.20 based on parts list below:
3D printed frames for Poppy Ergo Jr figure
https://github.com/poppy-project/poppy-ergo-jr/releases/
OLLO rivets
http://www.trossenrobotics.com/store/p/6980-OLLO-RIVET-SET-ORS-10.aspx ($5.50)
(6) Dynamixel XL-320 with cables, IDs numbered 11-16 starting from bottom
http://www.robotis.us/xl-series/ (6x$21.90)
OpenCM 9.04c controller board with USB cable
http://www.robotis.us/opencm9-04-c-with-onboard-xl-type-connectors/ ($19.90)
For power choose one of the following (or both)
Two OpenCM-compatible batteries and charger;
http://www.robotis.us/li-ion-battery-3-7v-1300mah-lb-040/ (2x$9.90)
http://www.robotis.us/li-ion-battery-charger-set-lbb-040/ ($6.90)
2 chargers allows charging both batteries at once
or compatible AC adapater, using a power hub helpful
and you will need to create a cable with one end half XL connector and one end AX connector
XL-style cables included with servos, AX-style cable below
http://www.robotis.us/robot-cable-3p-60mm-10pcs/ ($10.90)
http://www.trossenrobotics.com/6-port-rx-power-hub ($7.95)
https://www.trossenrobotics.com/p/power-supply-12vdc-2a.aspx ($10.95)
********************** END OF DESCRIPTION COMMENTS**********************************
*/
#include “PoppyErgoJr.h”
// ******************************************************************************
// ******************************************************************************
// List of Robot Poses
// MAKE CHANGES HERE TO ADD NEW POSES
int Awake[3][6] = {{512, 731, 263, 512, 119, 839},{1,2,3,4,5,6},{70,70,70,70,70,70}};
int TheStare[3][6] = {{700,702,276,470,202,625},{4,6,2,5,3,7},{1023,1023,1023,1023,1023,1023}};
int Resta[3][6] = {{512, 905, 137, 497, 229, 876},{0,0,0,0,0,0},{45,45,45,45,45,45}};
int Restb[3][6] = {{512, 887, 137, 497, 491, 835},{0,0,0,0,0,0},{25,25,25,25,25,25}};
// END OF CODE TO ADD NEW POSES
// ******************************************************************************
// ******************************************************************************
/* Program variables */
byte LED = 0;
word GoalPosition = 0;
// create dynamixel object
Dynamixel Dxl(DXL_BUS_SERIAL1);
void setup() {
SerialUSB.println(“Setup”);
Dxl.begin(3);
for (int i=0; i<7; i++) {
Dxl.jointMode(ID_NUM+i); //jointMode() is to use position mode
}
} // END SETUP
// main program loop
void loop() {
SerialUSB.println(“Awake”);
Strike_A_Pose(Awake);
delay(12000);
// ******************************************************************************
// ******************************************************************************
// List of Robot Poses
// MAKE CHANGES HERE TO ADD NEW POSES
SerialUSB.println(“The Stare”);
Strike_A_Pose(TheStare);
delay(12000);
// END OF CODE TO ADD NEW POSES
// ******************************************************************************
// ******************************************************************************
SerialUSB.println(“Sleep”);
Strike_A_Pose(Resta);
delay(2000);
Strike_A_Pose(Restb);
delay(2000);
delay(10000);
} // END OF MAIN PROGRAM LOOP
// Functions
void Strike_A_Pose (int pPose[3][6]) {
for (int i=0; i<7; i++) {
Dxl.writeWord(ID_NUM+i, XL_LED, pPose[1][i]);
Dxl.writeWord(ID_NUM+i, XL_GOAL_VELOCITY, pPose[2][i]);
Dxl.goalPosition(ID_NUM+i, pPose[0][i]);
}
} // end function StrikeAPose
FILE #2 of 2: PoppyEgoJr.h
#ifndef PoppyErgoJr_h
#define PoppyErgoJr_h
/* Dynamixel serial port defines */
#define DXL_BUS_SERIAL1 1 //Dynamixel on Serial1(USART1) <-OpenCM9.04
#define DXL_BUS_SERIAL2 2 //Dynamixel on Serial2(USART2) <-LN101,BT210
#define DXL_BUS_SERIAL3 3 //Dynamixel on Serial3(USART3) <-OpenCM 485EXP
/* LED RGB Values defines */
#define LED_OFF 0
#define LED_RED 1
#define LED_GREEEN 2
#define LED_YELLOW 3
#define LED_BLUE 4
#define LED_MAGENTA 5
#define LED_CYAN 6
#define LED_WHITE 7
/* Dynamixel XL320 Control Table defines */
#define XL_MODEL_NUMBER 0
#define XL_FIRMWARE 2
#define XL_ID 3
#define XL_TORQUE_ENABLE 24
#define XL_LED 25
#define XL_GOAL_POSITION 30
#define XL_GOAL_VELOCITY 32
#define XL_GOAL_TORQUE 35
#define XL_PRESENT_POSITION 37
#define XL_PRESENT_SPEED 39
#define XL_PRESENT_LOAD 41
#define XL_PRESENT_VOLTAGE 45
#define XL_PRESENT_TEMP 46
#define XL_MOVING 49
#define XL_ERROR_STATUS 50
/* first XL-320 in chain of six */
#define ID_NUM 11
#endif


